Video Lecture
Theory For Making Notes
Accuracy
It is the extent to which a reported measurement approaches the true value of the quantity measured. Problems with accuracy are due to errors.
Precision
Precision is how consistent results are when measurements are repeated. Precise values differ from each other because of random error, which is a form of observational error. It is the degree of exactness or refinement of a measurement. Precision describes the limitation of the measuring instrument.
For example
if actual value of a quantity is 60 units and we take 3 readings of it using an instrument and we get 50.40, 50.45,50.36 then as the readings are very close to each other it is said to be precise but since the readings are not close to actual value (i.e.60) so readings are not accurate.
Hence precision is independent of accuracy. You can be very precise but inaccurate. You can also be accurate but imprecise.
In an experiment accuracy and precision both matter and it’s best when measurements are both precise and accurate.
Least Count
Smallest value of a physical quantity which can be measured accurately by an instrument.
In any scale it is given by the distance between two nearest graduations or markings.
For example in a meter scale the distance between two nearest markings is 1mm, hence the least count of a meter scale is 1mm
Leter on we will see that the maximum possible error present in any reading is equal to the least count of the instrument used.
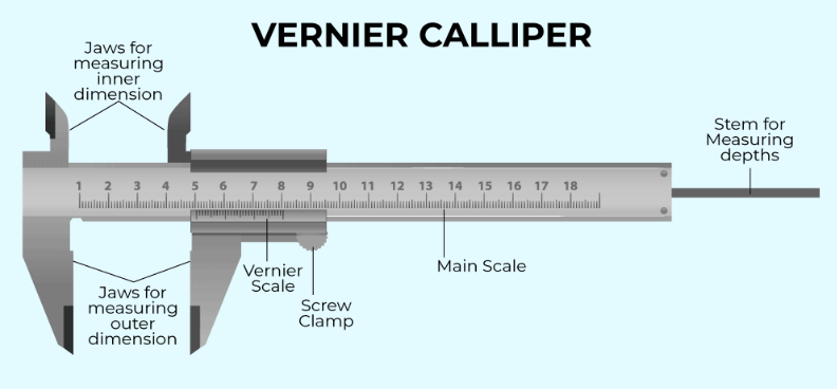
Least count of Vernier Calliper
The least count (LC) or the Vernier constant (V.C.) is the minimum value of correct estimation of length. The difference between the values of one main scale division and one Vernier scale division is known as Vernier constant or Least Count .
Therefore LC = 1.M.S.D. – 1.V.S.D.
Let N division of vernier scale coincides with (N-1) divisions of main scale
Hence n.V.S.D. = (n-1) M.S.D.
1.V.S.D. \displaystyle =\left( {\frac{{n-1}}{n}} \right) M.S.D.
Hence LC = 1.M.S.D. – 1.V.S.D. = 1.M.S.D. – \displaystyle \left( {\frac{{n-1}}{n}} \right)M.S.D.
\displaystyle =\frac{1}{n}\, (1 M.S.D.)
normally 1 M.S.D. is equal to 1mm hence LC \displaystyle =\frac{1}{n}\,mm
therefore we can also write LC \displaystyle =\,\frac{{Smallest\,Division\,on\,main\,scale}}{{No.\,of\,divisions\,on\,vernier\,scale}}
Usually in a Vernier calliper, one main scale division be 1 mm and 10 vernier scale divisions coincide with 9 main scale divisions as shown in the figure given below.
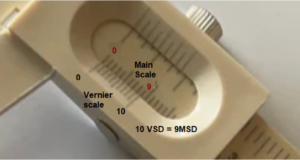
\ 1.V.S.D. = \displaystyle \frac{9}{{10}} M.S.D.=0.9 mm
\ Vernier constant = 1.M.S.D – 1.V.S.D. = 1 mm – 0.9 mm
= 0.1 mm = 0.01 cm
How to take reading a Vernier scale
The reading with vernier scale is read as given below :
(i) Firstly take the main scale reading (N) before on the left of the zero of the vernier scale.
(ii) Find the number (n) of vernier division which just coincides with any of the main scale division. Multiply this number (n) with vernier constant (V.C.)
(iii) Total reading = (N + n ´ V.C.)
Caution: The main scale reading with which the Vernier scale division coincides has no connection with reading
Suppose If we have to measure a length AB, the end A is coincided with the zero of the vernier scale as shown in fig. Its enlarged view is given in fig.
1.0 cm < Length AB < 1.1. cm
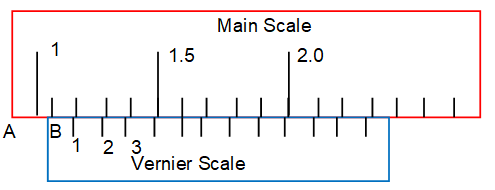
Let 5th division of vernier scale coincide with 1.6 cm of main scale. From diagram it is clear that the distance between 4th division of vernier scale and 1.5 cm of main scale is equal to one V.C. and distance between zero mark of vernier scale and 1.0 cm mark on the main scale is equal to 5 times the vernier constant.
\ AB = 1.0 + 5 ´ L.C. = 1.0 + 5 ´ 0.01 = 1.05 cm.
Illustration
In travelling microscope the vernier scale used has the following data.
1 M.S.D. = 0.5 mm, 50 V.S.D. = 49 M.S.D.
and the actual reading for distance travelled by travelling microscope is 2.4 cm with 8th division coinciding with a main scale graduation . Estimate the distance travelled.
Solution
In this case vernier constant = 1.M.S.D. – 1.V.S.D.
= 1.M.S.D. – \displaystyle \frac{{49}}{{50}}M.S.D.=\frac{1}{{50}}M.S.D=\frac{1}{{50}}\times 0.5\,mm
\displaystyle =\frac{5}{{10}}\times \frac{1}{{50}}=0.01\,mm=0.001\,cm
\ Distance travelled = 2.4 + 8 ´ 0.001 cm
= 2.408 cm
Illustration
The Vernier scale used in Fortin’s barometer has 20 divisions coinciding with the 19 main scale divisions. If the height of the mercury level measured is 5 mm and 15th division of vernier scale is coinciding with the main scale division. Then calculate the exact height of the mercury level (given that 1.M.S.D. = 1mm)
Solution
20 V.S.D. = 19 M.S.D. (Given)
1.V.S.D. = \displaystyle \frac{{19}}{{20}}\,\,M.S.D.
V.C. = 1. M.S.D. – 1.V.S.D \displaystyle =\left( {1-\frac{{19}}{{20}}} \right)\,M.S.D.
\displaystyle =\frac{1}{{20}}\,\,M.S.D.\,
\displaystyle =\frac{1}{{20}}\times 1\,mm=0.05\,mm
= 0.005 cm
Height of mercury level = 5 + 0.05 ´ 15
= 5.75 mm.
Zero Error
If the zero marking of main scale and Vernier scale do not coincide, necessary correction has to be made for this error which is known as zero error of the instrument. If the zero of the vernier scale is to the right of the zero of the main scale the zero error is said to be positive and the correction will be negative and vice versa.
Illustration
Consider the following data:
10 main scale divisions = 1cm,
10 vernier division = 9 main scale divisions,
zero of Vernier scale is to the right of the zero marking of the main scale with 6th Vernier division coinciding with a main scale division and the actual reading for length measurement is 4.3 cm with 2nd Vernier divisions coinciding with a main scale graduation. Estimate the length.
Solution
In this case, vernier constant = \displaystyle \frac{{1\,mm}}{{10}}=0.1mm
Zero error = 6 ´ 0.1 = + 0.6 mm
Correction = -0.6 mm
Actual length = (4.3 + 2 ´ 0.01) + correction
= 4.32 – 0.06 = 4.26 cm.
Screw Gauge (or Micrometer Screw)
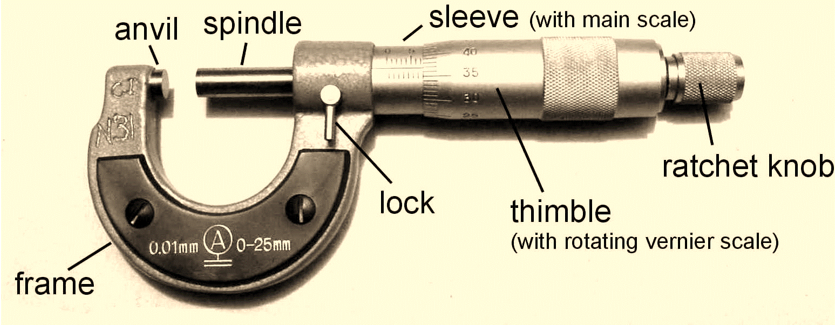
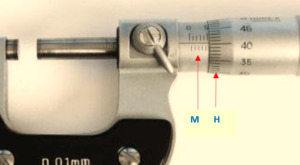
In general Vernier Calipers can measure accurately upto 0.02 mm and for greater accuracy micrometer screw devices, e.g. screw gauge, spherometer are used. These consist of accurately cut screw which can be moved in a closely fitting fixed nut by turning it axially. The instrument is provided with two scales as shown in the figure given below
(i) The main scale or pitch scale `M’ graduated along the axis of the screw.
(ii) The cap-scale or head scale `H’ round the edge of the screw head.
Important terms
(a) Pitch
The translational motion of the screw is directly proportional to the total rotation of the head. The pitch of the instrument is the distance between two consecutive threads of the screw which is equal to the distance moved by the screw due to one complete rotation of the cap. Thus if 10 rotations of cap º5 mm, then pitch = 0.5 mm
In general, pitch \displaystyle \frac{{1\,mm}}{{10}}=0.1mm
(b) Least count
In this case also, the minimum (or least) measurement (or count) of length is equal to one division on the main scale which is equal to pitch divided by the total cap divisions. Thus in the aforesaid Illustration, if the total cap division is 100, then least count = 0.5 mm/100
= 0.005 mm
In general, In case of circular scale,
Least count \displaystyle =\frac{{Pitch}}{{Number\,of\,divisions\,on\,circular\,scale}}
If pitch is 1 mm and there are 100 divisions on circular scale, then
Least count \displaystyle =\frac{{1\,mm}}{{100}} = 0.01 mm = 0.001 cm
= 0.00001 m = 10–5 m = 10 mm
Since least count is of the order of 10 mm, So the screw is called a micrometer screw. Screw gauge and the spherometer which work on the principle of micrometer screw, consist essentially of the following two scales.
(i) Linear or Pitch scale
It is a scale running parallel to the axis of the screw.
(ii) Circular of Head scale
It is marked on the circumference of the circular disc or the cap attached to the screw.
Zero Error
In a perfect instrument the zero of the head scale coincides with the line of graduation along the screw axis with no zero-error, otherwise the instrument is said to have zero-error which is equal to the cap reading with the gap closed. This error is positive when zero line or reference line of the cap lies below the line of graduation and vice-versa. The corresponding corrections will be just opposite.
Illustration
A screw gauge has 100 divisions on its circular scale. Circular scale travels one division on linear scale in one rotation and 10 divisions on linear scale of screw gauge is equal to 5 mm. What is the least count of a screw gauge.
Solution
\displaystyle Pitch=\frac{{1\,division\,\,on\,linear\,scale}}{{1\,rotation}}\,=1\,div.
10 division = 5 mm
\ 1 division = 0.5 mm
\ pitch = 0.5 mm
\displaystyle least\,count\,=\frac{{Pitch}}{{No.\,of\,divisions\,on\,circular\,scale}}
\displaystyle =\,\frac{{0.5\,mm}}{{100}}\,=0.005\,mm
Illustration
The screw gauge mentioned in above illustration is used to measure thickness of a coin. The reading of the linear scale is 4th div and 25th division of circular scale is coinciding with it. What is the value of thickness of the coin.
Solution
Reading = Linear scale Reading + Least count ´ circular scale reading
= 4th division on linear scale + 0.005 mm ´ 25
= 4 ´ 0.5 mm + 0.125 mm
= 2 mm + 0.125 mm
= 2.125 mm
Illustration
A spherometer has 250 equal divisions marked along the periphery of its disc and one full rotation of the disc advances it on the main scale by 0.0625 cm. The least count of the spherometer is
(A) 2.5´10–2cm (B) 25 ´ 10–3cm
(C) 2.5´10–4 cm (D) none of the above
Solution
Least count = \displaystyle \frac{{0.0625}}{{250}}cm = 2.5 ´ 10–4cm
\ Answer is (C)
Practice Questions (Level-1)
1.
Which of the following option correctly defines the pitch of a screw gauge
(a)It is equal to the distance travelled by the tip of the screw for one complete rotation of the head.
(b)It is the ratio of the distance travelled by a screw to the number of revolutions.
(c)Pitch = Least count of screw gauge x number of divisions on circular scale
(d)all of the above
Ans : (d)
2.
If 10 rotations of the cap of a screw gauge is equivalent to 5 mm and the cap has 100 divisions. Find the least count.
(a) 0.0005mm
(b) 0.05mm
(c) 0.0005cm
(d) 0.5mm
Ans : (c)
3.
The vernier scale is divided into 30 divisions, which coincides with 29 main scale divisions. If each main scale division is (1/2)mm, the least count by the instrument is
(a) 1/60 mm
(b) 1 mm
(c) 1/30 mm
(d) 0.5 mm
Ans : (a)
4.
In screw gauge no. of division on circular scale is n and circular scale travels a distance of a units in one rotation. Calculate least count of the screw gauge.
(a)n/a+1
(b) n/a
(c) a/n+1
(d) a/n
Ans : (d)
5.
If (n + 1)th divisions of vernier side coincides with nth division of main scale then find the least count of the vernier. It is given that one main scale division is equal to a units.
(a) n/a+1
(b) n/a
(c) a/n+1
(d) a/n
Ans : (c)
6.
Which of the following instrument is the most precise device for measuring length
(a) A vernier calliper with 20 divisions on the sliding scale, coinciding with 19 main scale divisions where smallest division on the main scale is 1 mm.
(b) A screw gauge of pitch 1 mm and 100 divisions on the ‘circular scale.
(c) An optical instrument that can measure length to within a wavelength of visible light
(d) A meter scale
Ans : (c)
Practice Questions (Level-2)
1.
10 rotations of the cap of a screw gauge is equivalent to 5 mm. The cap has 100 divisions. A reading taken for the diameter of wire with this screw gauge shows 4 complete rotations and 35 on the circular scale. Find the diameter of the wire.
(a) 365mm
(b) 2.175mm
(c) 4.258mm
(d) 2.100mm
Ans : (b)
2.
A screw gauge of pitch 0.5 mm has a circular scale divided into 50 divisions. The screw gauge is used to measure the thickness of a coin. The main scale reading is 2 mm and 35th circular division coincides with main scale with a positive zero error of divisions. Find the thickness of the coin
(a) 2.38mm
(b) 2.56 mm
(c) 2.98mm
(d) 2.35 mm
Ans : (d)
3.
A Vernier calliper has 50 divisions on its Vernier scale. Minimum division in main scale is of 1 mm. During a length measurement, zero of this Vernier scale is between 12th and 13th divisions of the main scale and 26th division of the Vernier scale coincides with a main scale division. What is the length ?
(a) 52 mm
(b) 10.43 mm
(c) 12.82 mm
(d) 15.03 mm
Ans: (a)
4.
In a screw gauge the graduation in the circlar scale consists of 100 equal division and 10 complete rotation of the head scale is equivalent to 5 mm on the main scale. While measuring diameter of a wire with screw gauge, initial head scale reading is 47. After completing 2 complete rotations the final head scale division is 53. then find the diameter of the wire.
(a) 1.59 mm
(b) 1.03 mm
(c) 1.08 mm
(d) 1.68 mm
Ans : (b)
5.
The vernier scale of a travelling microscope . has 50 divisions which coincide with 49 main scale divisions. If each main scale division is 0.5 mm, calculate the minimum inaccuracy in the measurement of distance.
(a) 01 mm
(b) 0.05 mm
(c) 0.02 mm
(d) none
Ans : (b)
6.
The diameter of a wire is measured with a screw gauge having 50 divisions on circular scale and by one complete rotation of circular scale, main scale moves 0.5 mm. If reading of screw gauge is 0.250 cm. The minimum percentage error in the reading will be
(a) 0.4
(b) 0.8
(c) 4
(d) 5
Ans : (a)
